Building mainline U-boot and Linux kernel for Orange Pi boards
This tutorial explains how to build a custom Linux kernel system for Orange Pi boards. You will need:
- an Orange Pi board (in this tutorial we use an Orange Pi PC Plus);
- a microSD card (at least 8GB, class 4);
- a computer running Linux;
- an ARM cross compiler (we use Linaro GCC);
- a bootloader (we use Das U-boot);
- Linux kernel source code;
- a root file system (we use Debian).
Get an ARM cross compiler
The first step to do is getting an ARM cross compiler. We suggest the use of Linaro GCC toolchain. To download the latest release you can visit this site https://releases.linaro.org/components/toolchain/binaries/, choose a release and download the tarball gcc-linaro-<release>-x86_64_arm-linux-gnueabihf.tar.xz. Alternatively you can open a terminal and use wget command, for example to downloade the release 7.2.1-2017.11 you have to type:
$ wget -c releases.linaro.org/components/toolchain/binaries/7.2-2017.11/arm-linux-gnueabihf/gcc-linaro-7.2.1-2017.11-x86_64_arm-linux-gnueabihf.tar.xz
Then extract the tarball with the followign command:
$ tar xf gcc-linaro-7.2.1-2017.11-x86_64_arm-linux-gnueabihf.tar.xz
It's suggested for the next uses to save the path of the cross compiler in an enviroment variable:
$ export CC=`pwd`/gcc-linaro-7.2.1-2017.11-x86_64_arm-linux-gnueabihf/bin/arm-linux-gnueabihf-
You can verify the correct installaton of the cross compiler typing the command:
$ ${CC}gcc --versionThe output of this command should be something like:
arm-linux-gnueabihf-gcc (Linaro GCC 7.2.1-2017.11) 7.2.1 20171111

Copyright (C) 2017 Free Software Foundation, Inc.

This is free software; see the source for copying conditions.  There is NO

warranty; not even for MERCHANTABILITY or FITNESS FOR A PARTICULAR PURPOSE.
Build the bootloader
The next step is the cross compilation of the bootloader. The bootloader is the program that loads the Operating System kernel from the secondary memory to the primary memory (generally RAM) so the processor can excute it and starts the boot of the system. We suggest the use of Das U-boot: it's an open source bootloader used especially to load Linux in several architectures including ARM. You can download U-boot from Github typing the following commands:
$ git clone https://github.com/u-boot/u-boot

$ cd u-boot/

$ git checkout v2017.11 -b tmp
Configure and build U-boot it's easy because U-boot supports many Orange Pi boards via defconfig, so you just need to type:
$ make ARCH=arm CROSS_COMPILE={CC} distclean

$ make ARCH=arm CROSS_COMPILE={CC} <orangepi_model>_defconfig

$ make ARCH=arm CROSS_COMPILE={CC}
where <orangepi_model> depends on the board that you want to use, for example for Orange Pi PC Plus it's orangepi_pc_plus. At the end of the building you will find in u-boot folder the file u-boot-sunxi-with-spl.bin. You will use this file soon for the setup of the microSD card.
Build Linux kernel
The next step it's the building of the Linux kernel. First of all download the source code by the Linux Kernel Archives. It's suggested to download a stable or longterm version of Linux kernel. We try the version 4.14. When you finish to download the kernel source code extract it. Then you to have to configure and build the kernel. Open a Linux terminal and type the following commands:
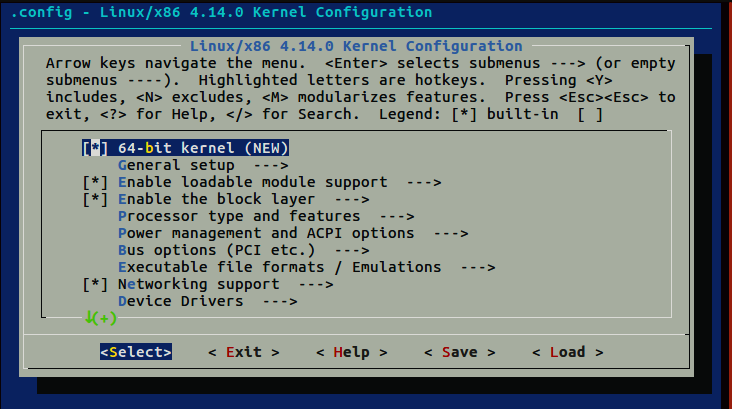
$ cd <kernel_path>

$ make ARCH=arm CROSS_COMPILE=arm-linux-gnueabihf- sunxi_defconfig

$ make ARCH=arm CROSS_COMPILE=arm-linux-gnueabihf- menuconfig

$ make -j$(nproc) ARCH=arm CROSS_COMPILE=arm-linux-gnueabihf- zImage modules <board>.dtb

$ make ARCH=arm CROSS_COMPILE=arm-linux-gnueabihf- modules_install
For Orange Pi PC Plus the dtb file to compile is sun8i-h3-orangepi-pc-plus.dtb. With the tool menuconfig you can configure the Linux source with a menu-driven user interface.
At the end of the building you can find the zImage file in the directory <kernel_path>/arch/arm/boot and the dtb file in the directory <kernel_path>/arch/arm/boot/dts.
Download a root file system
Now you can download a root file system. We tested Debian 9.2 (Stretch). In order to download it and then extract it type the following commands:
$ wget -c https://rcn-ee.com/rootfs/eewiki/minfs/debian-9.2-minimal-armhf-2017-10-07.tar.xz

$ tar xf debian-9.2-minimal-armhf-2017-10-07.tar.xz
Howewer you are free to choose what root file system you prefer.
Setup microSDcard
This section explains how to setup a microSD card in order to boot your Orange Pi board. You need:
- the file u-boot-sunxi-with-spl.bin;
- the Linux kernel image (uImage or zImage);
- the specific dtb file for the board;
- a root file system.
The first step is to insert the microSD card in your computer and identify it. Usually it should be /dev/mmcblk0. The following steps expect that your SD card is /dev/mmcblk0; if your computer identify the device differently use its name instead of /dev/mmcblk0.
Then create two partitions in your microSD card: the first one is the bootable partition that contains the kernel image, the dtb file and the eventual uEnv.txt file, the second partition contains the root file system. To create the partitions you can use the Linux command fdisk:
$ sudo fidsk /dev/mmcblk0
In order to create the two partitions:
Command (m for help): n                                 # Type n
Partition type:
   p   primary (0 primary, 0 extended, 4 free)
   e   extended
Select (default p):                                     # Press Enter Key
Using default response p
Partition number (1-4, default 1):                      # Press Enter Key
Using default value 1
First sector (2048-15523839, default 2048):             # Press Enter Key
Using default value 2048
Last sector, +sectors or +size{K,M,G} (2048-15523839, default 15523839): +20M      # Type +20M

Command (m for help): n                                   # Type n
Partition type:
   p   primary (1 primary, 0 extended, 3 free)
   e   extended
Select (default p):                                       # Press Enter Key
Using default response p
Partition number (1-4, default 2):                        # Press Enter Key
Using default value 2
First sector (43008-15523839, default 43008):
Using default value 43008
Last sector, +sectors or +size{K,M,G} (43008-15523839, default 15523839): # Press Enter Key
Using default value 15523839
Then you have to format the two partitions, the first with a FAT file system, the second with an EXT4 file system. You can use Linux mkfs command:
$ sudo mkfs.vfat /dev/mmcblk0p1

$ sudo mkfs.ext /dev/mmcblk0p2
Now you have to clean the partition table of your microSD card and write the u-boot-sunxi-with-spl.bin typing these commands:
$ dd if=/dev/zero of=/dev/mmcblk0 bs=1k count=1023 seek=1

$ dd if=<u-boot_path>/u-boot-sunxi-with-spl.bin of=/dev/mmcblk0 bs=1024 seek=8
Now you have to copy in the first partition the kernel image and the specific dtb file for the board (for Orange Pi PC Plus it's sun8i-h3-orangepi-pc-plus.dtb). In order to do that type:
$ sudo mount /dev/mmcblk0p1 /mnt

$ sudo cp -v <kernel_path>/arch/arm/boot/zImage /mnt

$ sudo cp -v <kernel_path>/arch/arm/dts/<board>.dtb /mnt

$ sudo umount /mnt
Since Orange Pi boards don't use by default uEnv.txt file it's suggested to not create it.
Then you have to copy the root file system and the kernel modules in the second partition with the following commands:
$ sudo mount /dev/mmcblk0p2

$ sudo tar xfvp <root_file_system_path>/<root_file_system>.tar.gz -C /mnt

$ sync

$ sudo chown root:root /mnt

$ sudo chmod 755 /mnt

$ sudo cp -rv <kernel_modules_path>/* /mnt/lib

$ sync

$ sudo umount /mnt
Now you have a bootable microSD card and you are ready to use your Orange Pi board.
There is only a last thing to do: since you don't use the uEnv.txt file, at the first boot you have to set an U-boot environment variable that contains the instrunctions to execute at the boot. So, at the first boot, type any key to stop autoboot and enter in U-boot command line. Then you have to set the environment variable bootargs and modify the variable bootcmd, executed by default at boot. At the end save the modified environment and boot the board.
=> setenv bootargs console=${console} root=/dev/mmcblk0p2 rw rootwait

=> setenv bootcmd `mmc rescan; fatload mmc 0 0x46000000 zImage; fatload mmc 0 0x49000000 ${fdtfile}; bootz 0x46000000 - 0x49000000`

=> saveenv

=> boot
At the next boots the board will boot automatically. Now you can enjoy your Orange Pi board.
Quick guide to U-boot command line
This section is a quick guide to the U-boot command line. To learn more about specific themes visit the U-boot on-line manual at the site http://www.denx.de/wiki/DULG/Manual.
A very important command is the help command or ? that prints a list of all possible commands with a short explanation. To see the explanation of one particular command you have to type:
=> help <command>
Other four important commands are printenv, setenv, saveenv and envreset. They respectively print a list of all environment variables, configure an environment variable, save the environment variables to persistent storage and set environment variables to the default settings.
The boot command, instead, is the command executed by default at the boot and it runs the actions setted in bootmcd environment variable. So if you want to customize the boot process you have to modify this environment variable.
Other useful commands are run that runs the commands stored in an environment variable, bdinfo that print the informations about the board and fatload that load binary file from FAT file system.